Friday, October 23, 2009

My First Bike - Suzuki TS 125

I can't remember how old I was - maybe 12.  My friend David had an old Suzuki TS 125 that he wanted to sell - he had recently gotten a new Honda 3-wheeler and was no longer riding the bike.  Somehow, I managed to talk my dad into buying this bike.  Mom and Dad certainly did not spoil me when I was a kid.  We had a nice home and I had nice stuff, but there was no brand new machine sitting in the garage on Christmas morning with a bow on it.  My parents taught me to take care of what I had and it will last you a long time.  I was the kid that actually washed and waxed his bicylce.  I haven't done so well with my kids - I can't even get them to use the damn kickstand.  But that's another story.  Anyway, while all my friends were getting fancy Honda 3 wheelers and other dirt bikes for Christmas, I was on the sidelines anxious to get my own motorized toy.  When David suggested I buy his old bike, I am sure I put some awesome sales pitch together and promised my parents the world....they bought it - and we bought the bike. 


The TS 125 that I had looked a little rougher than this one.  Mine was missing the headlight and tail rack.  Dad and I bought a plastic dirt bike number plate to replace the headlight - it looked pretty cool.  The bike wasn't very powerful and realistically probably needed a carburetor re-build at a minimum.  I didn't care.  I rode the bike on a flat field road behind my house - up and down, up and down.  I loved that bike.  I even remember riding it around the yard in the snow.  Ah - fun times...there is just something about the freedom of 2-wheels. 

Suzuki TS 185


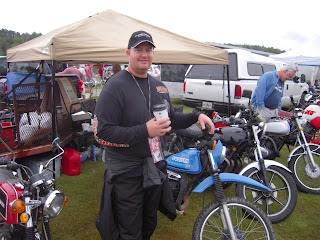
I have always enjoyed swap meets - airplanes, cars, or motorcycle.  It's interesting to see what "junk" people are selling.  Recently, at the Barber Vintage Motorcycle Festival in Birmingham, AL, I came across something that brought back fond memories of my childhood.  There for sale at the swap meet was an old Suzuki TS 185 Dual Sport bike.  I had one of those as a young boy - probably 15 years old when I got it.  I can remember loading it in the back my my pick up truck once I got my license and heading out to the abandon strip mines up near Clinton, IN with friends.  It wasn't the most powerful bike and I remember dumping it plenty of times trying to climb hills that were too tall for it's strength.  It was a pretty beat up bike, but I loved it nonetheless.  The guy at the swap meet was asking $1,000 for this bike - are you kiding me?  I think I gave some kid $100 for mine back in 1985.

KLR 650 - Pelican Top Box Installation

When I purchased my KLR, I decided to have the dealer throw in the factory luggage which included soft sided tail, saddle, and tank bags.  They generally look stylish, and function ok.  They were also inexpensive.  I think the dealer sold them to me for around $240 for the whole set.  Well, that old saying, you get what you paid for does apply here.  Soft sided bags have 2 major dissadvantages.  1.  They are not 100% water proof.  2.  They are not secure - you can use a luggage lock on the zippers, but, you can't bolt that bag to the bike so someone could easily walk off with your stuff if they wanted to.
PELICAN CASES
Pelican manufactures cases of all types.  They are well known for their camera and video equipment boxes, but over the years, creative people have adapted their boxes for many uses.  They are 100% waterproof, and lockable.  They have a variety of sizes, and the smaller boxes like the one I purchased come with customizable foam inserts.  For more information on Pelican, visit http://www.pelican.com/
THE INSTALLATION
After a bunch of research, I decided to buy the 1450 case.  My luggage rack will accomodate a much larger rack, but, for general day trip use, I don't need the extra space (have a large tank bag and saddle bags) and would rather keep the profile of the set up as slim as possible.  For anyone interested in doing a similar set up, I offer a summary of my experience installing the case on my tail rack as follows:
1.  Remove Tail Rack top cover.  There are 6 - 6mm bolts that hold the top rack on.

2.  Turn the case upside down and lay the rack on it and use as a template to mark your holes.  I decided to use the rear 2 sets of bolts so that the case set's as far back on the rack as possible.  My method for marking the holes was to put measure, then tape the rack to the box, then use a small drill bit to make pilot holes.

3.  Place the top rack back on the bike.  You are about to embark on the hardest part of the installation.  Lining the holes back up.  The rack is actually under a bit of a load.  Since the bolts are going into threaded holes, you have to get it right or you will strip out the threads and have a hole new problem.  I replaced the original bolts with longer ones - and actually, they were a little too long as I had to use washers.  This is something I will fix next time I stop by Lowe's.  Be sure to use Rubber Washers to help prevent water leakage. 

4.  Reflectors - Walmart's Automotive section has some stick on reflectors that actually dress up the boxes.  I also added a strip of reflective tape to the rear of the box.  Being seen is very important when you are riding a motorcycle!!!

5.  Locks - Lowe's sells a set of Master locks in a 4 pack that are all keyed the same - very nice as the top box has 2 lock clasps. 

That's it!  Now I have a very nice, lockable, water tight place to keep my valuables when riding.  No more loading my pockets up with all my stuff when I stop to use the bathroom or grab a coffee. 


Wednesday, October 14, 2009

2009 KLR 650 Luggage Review


I recently returned from a 3 night 4 day trip on my KLR 650. I have the factory tank bag, tail bag, and saddle bags. I got to test them out in a variety of conditions, and thought I would post a short review.

In short, I would summarize by saying if you are looking for a "light duty" set of bags that look great, are easy to use, and are inexpenive, then these are perfect. However, if you are looking for all weather gear that's lockable, look elsewhere!

STYLE AND FIT
The bags fit on the bike very easily and look great. They are easy to install and remove and definitely have the appearance that they are "meant for" this bike.  You can have any of the 3 on and off very quickly.  Also, they stay put too.  In other words, they don't flop around at highway speeds.

CAPACITY
The Tank bag expands and holds a large amount. However, the map pocket could be bigger - you have to be pretty good at properly folding a map to the area of your route to fit in the clear plastic pocket. The tank bag also droops towards the seat so reading it requires you to look down pretty far.  The saddle bags need to be expandable - they are just a bit too small. The tail bag is my favorite overall in terms of capacity. It expands and can hold a good amount of gear.  On my recent trip, I used a backpacking compression stuff sack for all my clothes which included extra pants, sweatshirts, etc.  Jammed it all right in there!

WATERPROOFING
OK - so most of what I have written so far sounds pretty good right?  Well hang on.  Let's talk about keeping your stuff dry.  Not so much.  I knew these bags would probably let some moisture in so I packed everything in zip lock bags.  Good thing.  There was a puddle of water in the bottom of the tank bag, and everything in the saddle bags was soaked (my tools, first aid kit, and extra shoes).  The tail bag didn't do too bad.  It did let some moisture in but there wasn't a puddle of water. 

DURABILITY
I have owned the bike for 3 months now.  I have used the bags in a variety of conditions.  So far, they have held up fairly well.  They don't feel like the kind of bags that will last long if not cared for.  I can already tell that the first thing to go will be the attachment point where the tie down straps are sewn to the bags - it's a weak point on the tailbag and side bags.

CONCLUSION
That old saying "you get what you pay for" comes to mind.  These bags work fairly well for the roughly $250 bucks that the dealership sold them to me for.  I know how to pack for rainy weather so I can live with some water leaks.  If one of the lightweight straps rips, I will repair it.  Between the 3 bags, there is enough capacity to handle my typical trips.  My biggest issue/complaint that I haven't raised so far is lockability.  I have never had an issue with theft of items left on my motorcycles.  I never really worry about it at biker events - bikers just don't seem to mess with each others stuff - I guess it's that mutual respect thing we all have for each other and our hobby.  It would be nice though to have at least one bag on the bike that locked for "piece of mind".   

Friday, October 2, 2009

"Guzzi Chris and his new toy"


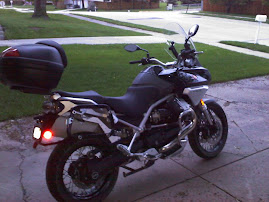
One of my Florida buddies, Chris Galardi, went on a trip recently to Ohio. Chris is one of those guys that is a member of the "Iron Butt" club. He is not afraid to travel cross country on 2 wheels. He loves Moto Guzzi Bikes. He owned a Guzzi Breva 1100 that he only had for a few years and racked up I believe near 30,000 miles. He made a trip to California on it for the annual Moto Guzzi Rally last year. Anyway, on his way back from Ohio, he picked up this Moto Guzzi Stelvio - one of the new models Guzzi Introduced this year. He reports that he is very happy with this bike. I will see it next week when we gather at the Barber Vintage Motorcycle Festival in Birmgingham, AL.

Modifications to the KLR


After ripping through the Chattahoochee National Forest for a day, I quickly learned that the hard plastic factory engine skid plate wasn't going to do. I bought a new one from "Happy Trails" that's made of aluminum and they bundle it with side crash guards. I think it gives the bike a real "utility" or "mean" look!

Couple of other mods I have done are the aftermarket Center stand - great for doing maintenance, and "Barkbusters" hand guards. The factory hand guards had no metal or aluminum backbone so they were mainly cosmetic.