PELICAN CASES
Pelican manufactures cases of all types. They are well known for their camera and video equipment boxes, but over the years, creative people have adapted their boxes for many uses. They are 100% waterproof, and lockable. They have a variety of sizes, and the smaller boxes like the one I purchased come with customizable foam inserts. For more information on Pelican, visit http://www.pelican.com/
THE INSTALLATION
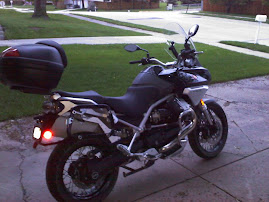
After a bunch of research, I decided to buy the 1450 case. My luggage rack will accomodate a much larger rack, but, for general day trip use, I don't need the extra space (have a large tank bag and saddle bags) and would rather keep the profile of the set up as slim as possible. For anyone interested in doing a similar set up, I offer a summary of my experience installing the case on my tail rack as follows:
1. Remove Tail Rack top cover. There are 6 - 6mm bolts that hold the top rack on.
2. Turn the case upside down and lay the rack on it and use as a template to mark your holes. I decided to use the rear 2 sets of bolts so that the case set's as far back on the rack as possible. My method for marking the holes was to put measure, then tape the rack to the box, then use a small drill bit to make pilot holes.
3. Place the top rack back on the bike. You are about to embark on the hardest part of the installation. Lining the holes back up. The rack is actually under a bit of a load. Since the bolts are going into threaded holes, you have to get it right or you will strip out the threads and have a hole new problem. I replaced the original bolts with longer ones - and actually, they were a little too long as I had to use washers. This is something I will fix next time I stop by Lowe's. Be sure to use Rubber Washers to help prevent water leakage.
4. Reflectors - Walmart's Automotive section has some stick on reflectors that actually dress up the boxes. I also added a strip of reflective tape to the rear of the box. Being seen is very important when you are riding a motorcycle!!!
5. Locks - Lowe's sells a set of Master locks in a 4 pack that are all keyed the same - very nice as the top box has 2 lock clasps.
That's it! Now I have a very nice, lockable, water tight place to keep my valuables when riding. No more loading my pockets up with all my stuff when I stop to use the bathroom or grab a coffee.


+of+P4180003.JPG)


No comments:
Post a Comment